
ACPI
Advanced Configuration and Power Interface (ACPI) is an open standard that operating systems can use to discover and configure computer hardware components, perform power management (e.g. putting unused hardware components to sleep), auto configuration (e.g. Plug and Play and hot swapping), and status monitoring.Why do we care about ACPI?
For starters, a lot of manufacturers gate some devices like the I2C controller, the GPIO controller, FN keys functionality, amongst others behind checks for operating systems like Windows.
The main ACPI table in a system is the DSDT (Differentiated System Description Table), which defines most of the devices. Then there are the SSDTs (Secondary System Description Tables), which add extra properties (for example, the _PRW (Power Resources for Wake) method), extra devices, disable some devices based on a condition, etc.
Most firmware define the devices in the DSDT and use some SSDTs to adjust values depending on the installed hardware and/or BIOS settings. If you're interested in ACPI, you can learn more by reading the ACPI Specification.
In the past, these SSDTs had to be written manually, but now we have automated tools that do this process. We will use SSDTTime.
DSDT from the target system and selecting it instead of pressing P later.Since SSDTTime does not have any releases and it's a Python project, we will download the source code instead by clicking on Code > Download Zip.
After extracting the archive, Windows users should run SSDTTime.bat, while Linux users will have to open their terminal, change directory to SSDTTime, and then run python3 SSDTTime.py.
.command files.Upon launching the tool, it will automatically download iASL, which (de)compiles ACPI tables. You should then be greeted with this:
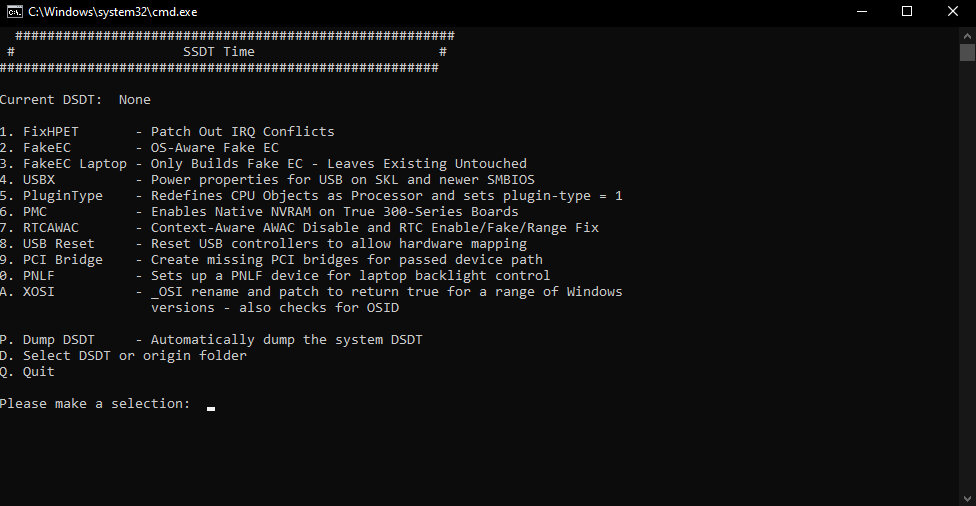
Here we see that, at the time of writing, there are 11 options available:
FixHPET
FixesIRQ(Interrupt Request) conflicts in the ACPI tables. These conflicts can cause some hardware like sound to not work properly.FakeEC
Creates a fake Embedded Controller device for macOS to work properly and disables the original EC.FakeEC Laptop
Creates a fake Embedded Controller device for macOS to work properly, but does not disable the original EC, because laptops need it for battery status, FN keys, etc.USBX
Creates an USBX device which contains USB power properties necessary proper functionality. This also requires a valid EC device.PluginType
It sets theplugin-typeproperty to1on the first CPU core, enablingX86PlatformPlugin, which allows for (Intel) CPU Power Management andAGPM(Apple GPU Power Management). It also redefines the processors withProcessorobjects instead ofDeviceobjects if required, since macOS doesn't support the newer standard.PMC
Defines thePMCRdevice on systems that don't have it to allow nativeNVRAMsupport.RTCAWAC
Disables the newAWAC(Alarm Wake ACPI Clock) and enables theRTC(Real-Time Clock) instead.USB Reset
Disables theRHUBdevices in ACPI for all USB controllers to allow macOS to enumerate USB ports properly on borked ACPI systems. We will not use this since we will create an USB map.PCI Bridge
macOS requires all devices that we inject properties into to have their PCI bridges defined, this is what this SSDT does, we will not use it for now.PNLF
Creates a fakePNLFdevice with an user-selectable_UID(basically the profile it uses) to allow for native brightness control on laptops.XOSI
Spoofs the operating system to Windows, allowing any peripherals locked behind non-macOS to be active on macOS.
We will start with option P. It dumps the current system's DSDT, which will be utilised in order to create these SSDTs and patches.
All systems should choose:
FixHPET
Choose optionCwhich only patches conflicting IRQs from legacy devices.USBX
Choose the default option (Bkey).RTCAWAC
Don't worry if it says you don't need it, just continue.PluginType
AMD desktops should choose, in addition
FakeEC
AMD laptops should choose, in addition
FakeEC LaptopPNLFXOSI
Choose default (Akey)
Here's how the Results folder would look like after we're done
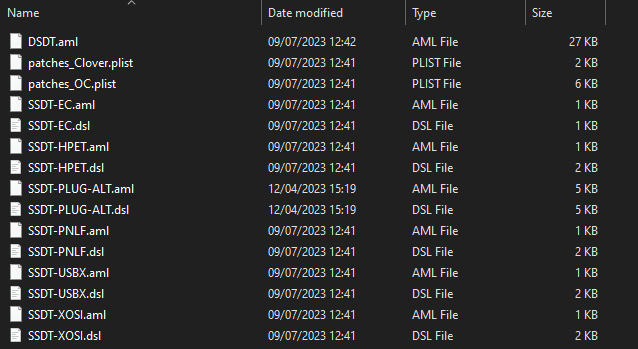
We will now copy all the files that start with SSDT and end in .aml inside of Drive/EFI/OC/ACPI.
Finally, we will merge patches_OC.plist by using the PatchMerge script included with SSDTTime. Run it the same way as SSDTTime.
Press 1 to select the config.plist created in an earlier step, then drag and drop your config.plist onto the window, and press enter.
The modified config.plist with the patches merged in will appear in the Results folder. Check that it's okay, then replace your copy with this one.
And that's it, we're done. Now, we need to gather all the required kexts.